Issue:
I have web services that hosted on farm environment with load balancer (LB) and SSL terminated on web services. Meaning web service running on port 80 only without certificate, SSL is handle in LB. I can’t get it to work with wsHttpBinding. How can I get wsHttpBinding to work with load balancer on port 80?
Flow:
LB (SSL) -> Apps (Node A/B) -> LB (SSL) -> Web Services (Node A/B on Port 80)
Environment:
Windows 10, Microsoft WCF Test Client version 12.0.*, IIS on Windows Server 2012 R2, Load Balancer
Resolution:
Since LB terminate the SSL at LB lever, web service needs to be host as http (port 80), not https. To do that, here are settings for WCF server and client.
Step-by-step instructions:-
- WCF Server Settings
 <system.serviceModel>
 <services>
 <service behaviorConfiguration="ServiceBehavior" name="My.Ns.WcfService">
 <clear />
 <endpoint address=""
binding="wsHttpBinding"
bindingConfiguration="wsHttpBinding_IWcfService"
name="IWcfServiceEndpoint"
bindingNamespace="https://my.domain.com/App/WcfService.svc"
contract="My.Ns.IWcfService" >
 <identity>
 <dns value="localhost" />
 </identity>
 </endpoint>
 <endpoint address="basic"
binding="basicHttpBinding"
bindingConfiguration="basicHttpBinding_IWcfService"
name="basicHttpBinding"
bindingNamespace="https://my.domain.com/App/WcfService.svc"
contract="My.Ns.IWcfService" >
 <identity>
 <dns value="localhost" />
 </identity>
 </endpoint>
 <endpoint address="mex" binding="mexHttpBinding" contract="IMetadataExchange" />
 </service>
 </services>
 <protocolMapping>
 <add scheme="http" binding="wsHttpBinding" bindingConfiguration="wsHttpBinding_IWcfService" />
 </protocolMapping>
 <bindings>
 <wsHttpBinding>
 <binding name="wsHttpBinding_IWcfService" maxBufferPoolSize="2147483647" maxReceivedMessageSize="2147483647">
 <readerQuotas maxDepth="32" maxStringContentLength="5242880" maxArrayLength="2147483646" maxBytesPerRead="4096" maxNameTableCharCount="5242880"/>
 <security mode="None">
 <transport clientCredentialType="None"/>
 </security>
 </binding>
 </wsHttpBinding>
 <basicHttpBinding>
 <binding name="basicHttpBinding_IWcfService" maxBufferPoolSize="2147483647" maxReceivedMessageSize="2147483647">
 <readerQuotas maxDepth="32" maxStringContentLength="5242880" maxArrayLength="2147483646" maxBytesPerRead="4096" maxNameTableCharCount="5242880" />
 <security mode="None" />
 </binding>
 </basicHttpBinding>
 </bindings>
</system.serviceModel> - WCF Client Settings
 <system.serviceModel>
 <bindings>
 <basicHttpBinding>
 <binding name="basicHttpBinding" />
 </basicHttpBinding>
 <wsHttpBinding>
 <binding name="wsHttpBinding">
 <security mode="Transport">
 <transport clientCredentialType="None" />
 </security>
 </binding>
 </wsHttpBinding>
 </bindings>
 <client>
 <endpoint address="https://my.domain.com/App/WcfService.svc"
binding="wsHttpBinding" bindingConfiguration="wsHttpBinding"
contract="MyServiceRef.IWcfService" name="wsHttpBinding">
 <identity>
 <dns value="localhost" />
 </identity>
 </endpoint>
 <endpoint address="http://my.domain.com/App/WcfService.svc/basic"
binding="basicHttpBinding" bindingConfiguration="basicHttpBinding"
contract="MyServiceRef.IWcfService" name="basicHttpBinding" />
 </client>
</system.serviceModel> - To test service in WCF Test Client (C:\Program Files (x86)\Microsoft Visual Studio\2017\Enterprise\Common7\IDE\WcfTestClient.exe)
- Add service by clicking on File, Add Service
- Enter service URL with https, ex., https://my.domain.com/app/wcfservice.svc
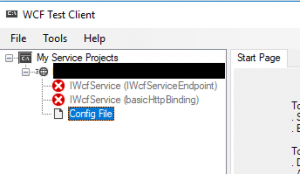
- Right click on Config File and select Edit with SvcConfigEditor

- Change https to http since service is running on port 80
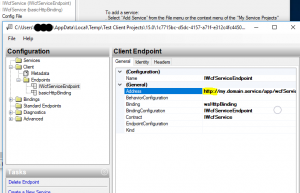
- Change security to none
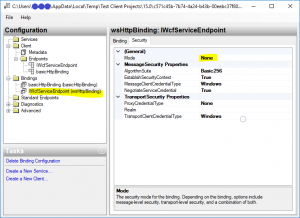
- Click on File, Save, File, Exit, and Reload.
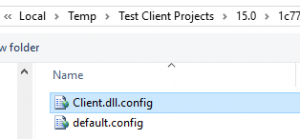
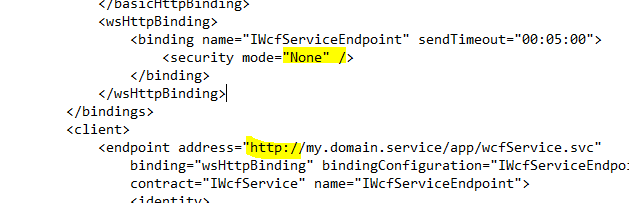
- (Alternative) Edit Client.dll.config file directly and change https to http and security to none as shown below:
- Test your method
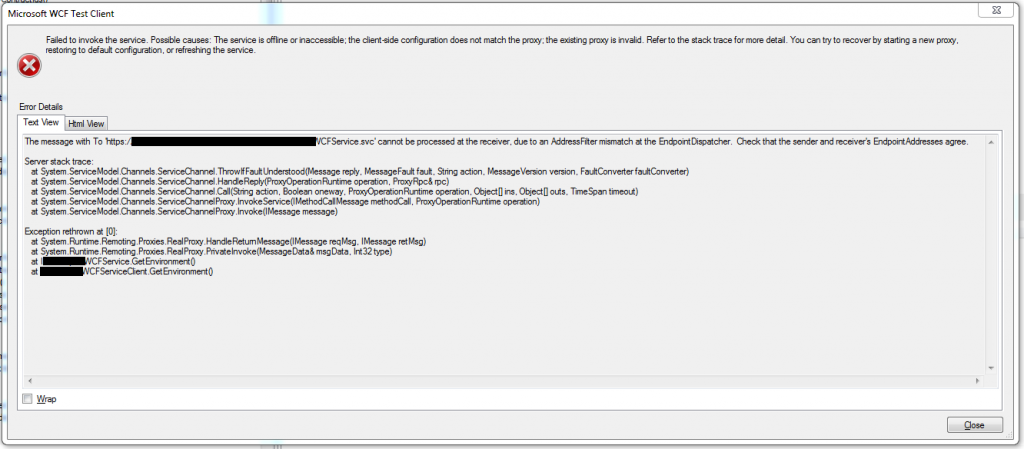
Troubleshoot:
- If you get an address no match error, make sure your service method have [ServiceBehavior(AddressFilterMode = AddressFilterMode.Any)] added

Reference:
Sample Client.dll.config file for WCF Test Client
<?xml version="1.0" encoding="utf-8"?>
<configuration>
    <system.serviceModel>
        <bindings>
            <basicHttpBinding>
                <binding name="basicHttpBinding" sendTimeout="00:05:00" />
            </basicHttpBinding>
            <wsHttpBinding>
                <binding name="IWcfServiceEndpoint" sendTimeout="00:05:00">
                    <security mode="None" />
                </binding>
            </wsHttpBinding>
        </bindings>
        <client>
            <endpoint address="http://my.domain.com/app/WcfService.svc"
                binding="wsHttpBinding" bindingConfiguration="IWcfServiceEndpoint"
                contract="IWcfService" name="IWcfServiceEndpoint">
                <identity>
                    <dns value="localhost" />
                </identity>
            </endpoint>
            <endpoint address="http://my.domain.com/app/WcfService.svc/basic"
                binding="basicHttpBinding" bindingConfiguration="basicHttpBinding"
                contract="IWcfService" name="basicHttpBinding" />
        </client>
    </system.serviceModel>
</configuration>