How to Add FFMPEG or LIBAV-Tools to Docker WordPress Image?

Issue:

I’m having problem playing my .mov video after uploaded to my WordPress site. So I installed “Video Embed & Thumbnail Generator” plugin to display and play my video files, but it required FFMPEG or LIBAV for encoding. How do I add FFMPEG or LIBAV to my docker image?

Environment:

Docker, WordPress with Debian image, Video Embed & Thumbnail Generator plugin

Resolution:

Finding what you have and how to install it into your docker container is crucial. Otherwise, it’s pretty straight forward for installing libav-tools to WordPress Debian container. Follow these steps to install video encoding to your docker container.

Step-by-step instructions:-

  1. Find the name of the container you want to install libav-tools to by executing docker ps -a

  2. Once you get the name, use following syntax if you are running the same WordPress image that I have shown above.
    docker exec wp_tfphotos apt-get install -y libav-tools
  3. After it installed, check the WordPress image and make sure you can find FFMPEG under /usr/bin folder
    docker exec wp_tfphotos ls -li /usr/bin | grep ffmpeg
  4. Now you can go back to WordPress Admin screen under setting to continue setup your “Video Embed & Thumbnail Generator”.


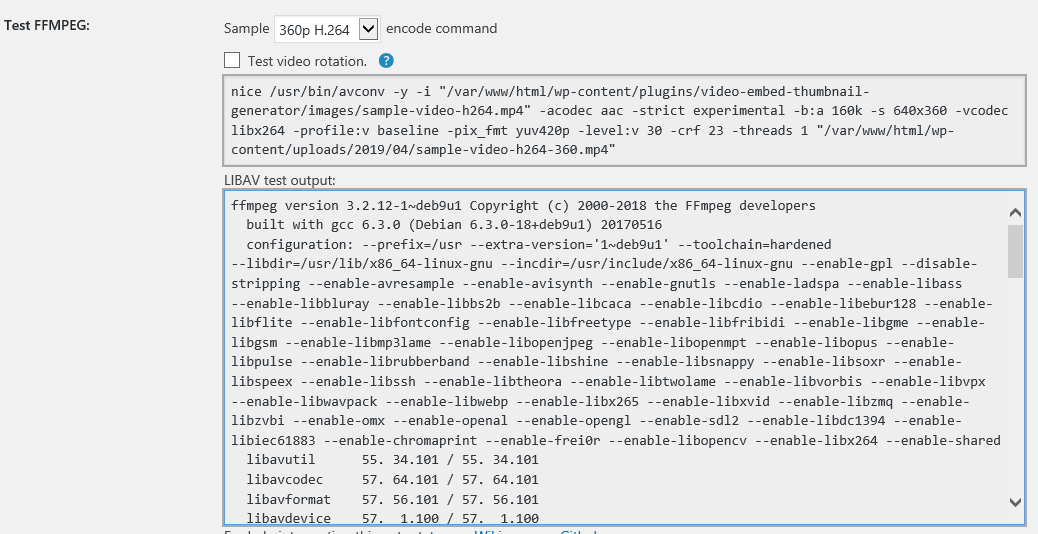
    Enter “/usr/bin” next to path and select “LIBAV” as an application

  5. Scroll down to the bottom of the screen and you should see FFMPEG test data.

  6. By now, you are ready to upload your first video file and encode with plugin software that required FFMPEG or LIBAV. Upload Issue?


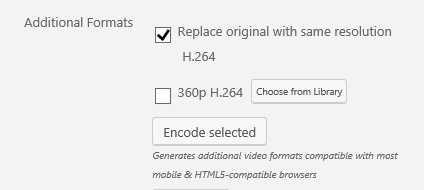
    Click on “Encode selected” button to encode your video.

  7. If encoding is successful, the mp4 file should be listed on your media page. From here you can either embed or create a playlist to display on the post/page. Have fun!
    {playlist type="video" ids="634,635"}

    Note: replace above “{” bracket with “[” for WordPress playlist embed code


Troubleshoot:

  • To verify if encoding is installed:
    docker exec [container-name] ls -li /usr/bin
  • To get updated package for your container:
    docker exec [container-name] apt-get update

Reference:

libav-tools

Docker DNS Issue Fixed

Issue:

I have recently installed Pi-Hole container on my docker. My CertBot container can’t access internet to renew certificates. Also, one of recently restarted WordPress container no longer able to access internet as well to add new plugins. What’s going on?

  • WordPress: can’t add new theme or plugin
  • CertBot: can’t connect to “https://acme-v01.api.letsencrypt.org/directory”

Environment:

Ubuntu, Docker, Nginx, Pi-Hole, CertBot, WordPress

Resolution:

Due to the container routing through Pi-hole, when container restarted, the routing go through Pi-Hole instead of router. So, in order for container to go directly to router and skip Pi-Hole, you have an option to add a daemon.json file with router gateway IP to Docker configuration location. To do this, please follow instructions below.

Step-by-step instructions:-

  1. First, locate where your docker daemon configuration file. Usually it’s located at “/etc/docker/daemon.json”. If you just see key.json file, then you’re in the right spot.
  2. If daemon.json not found, create daemon.json file with your favorite editor.
    sudo vi /etc/docker/daemon.json
  3. Copy and paste following content start with “{“ and end with “}” below:
    {
    "dns": ["10.0.0.1"]
    }
  4. Change sample DNS entry 10.0.0.1 to your DNS Server IP or Router IP address. If you setup Pi-Hole, look under your DNS entries. You may add alternative DNS failover with comma like below:
    {
    "dns": ["10.0.0.1","8.8.8.8"]
    }
  5. Save ([Esc]:wq) and restart docker service by typing:
    sudo service docker restart
  6. Once all your containers restarted, try ping again to see if problem resolves.
    To test CertBot container internet connectivity, use this command:

    sudo docker exec certbot_container_name ping google.com


Troubleshoot:

  1. If you can’t add new theme or plugin to WordPress, your WordPress container probably can’t access internet. Try above solution and restart your container.
  2. If you try to create certificate with CertBot and get an error message saying something like can’t connect to “https://acme-v01.api.letsencrypt.org/directory”. Try above solution and restart your container.
  3. If your Docker container route traffic through Pi-Hole (i.e., 10.0.0.2) due to changed in router Dnsmasq, try above solution and restart your container.
    Dnsmasq = dhcp-option=6,10.0.0.2

Reference:

Daemon Configuration File

Sample command to test if docker site is working:

root@server:$ curl -H "Host: www.problemsolvedtoo.com" localhost

Sample command to create certificate with CertBot:

sudo docker exec certbot certbot certonly --webroot -w /var/www/certbot --staging --email certbot@problemsolvedtoo.com -d www.problemsolvedtoo.com --rsa-key-size 4096 --agree-tos --force-renewal