Issue:
After enabled Core 5 web.config to logging, the site display ANCM Failed error. What’s happening?
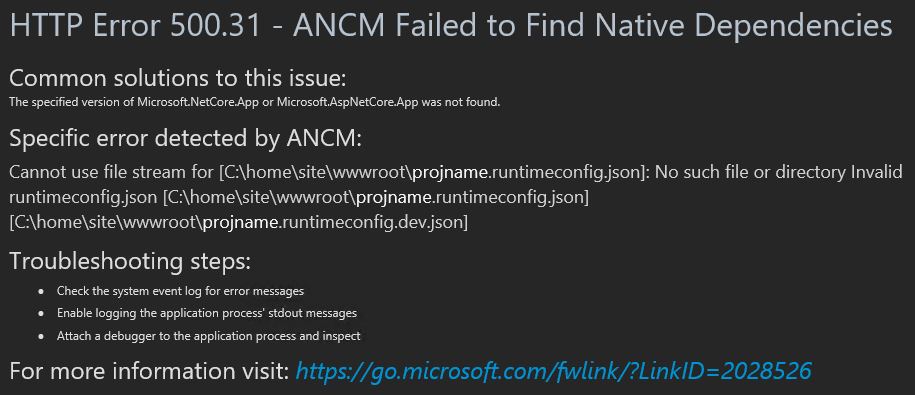
HTTP Error 500.31 - ANCM Failed to Find Native Dependencies
Common solutions to this issue:
The specified version of Microsoft.NetCore.App or Microsoft.AspNetCore.App was not found.
Specific error detected by ANCM:
Cannot use file stream for [C:\home\site\wwwroot\projname.runtimeconfig.json]: No such file or directory Invalid runtimeconfig.json [C:\home\site\wwwroot\projname.runtimeconfig.json] [C:\home\site\wwwroot\projname.runtimeconfig.dev.json]
Troubleshooting steps:
• Check the system event log for error messages
• Enable logging the application process' stdout messages
• Attach a debugger to the application process and inspect
For more information visit: https://go.microsoft.com/fwlink/?LinkID=2028526
My web.config settings with stdoutLogEnabled=”true”:
<?xml version="1.0" encoding="utf-8"?>
<configuration>
<!-- To customize the asp.net core module uncomment and edit the following section.
For more info see https://go.microsoft.com/fwlink/?linkid=838655 -->
<system.webServer>
<handlers>
<remove name="aspNetCore" />
<add name="aspNetCore" path="*" verb="*" modules="AspNetCoreModuleV2" resourceType="Unspecified" />
</handlers>
<aspNetCore processPath="%LAUNCHER_PATH%" arguments="%LAUNCHER_ARGS%" stdoutLogEnabled="true" stdoutLogFile=".\logs\stdout" hostingModel="inprocess" />
</system.webServer>
</configuration>
Environment:
- Azure App Service Hosting
- .Net Core 5
- Added custom web.config to the project
Resolution:
The issue is Azure App Service is expecting the log folder to be under Azure LogFiles folder. To correct this issue, just point stdoutLogFile=”.\logs\stdout” to stdoutLogFile=”\\?\%home%\LogFiles\stdout“. If you use web config transformation, change to stdoutLogFile=”\\?\%home%\LogFiles\stdout” on web.release.config with xdt:Transform=”Replace” attribute.
Step-by-step instructions:-
On web.config, it should looks like this:
<?xml version="1.0" encoding="utf-8"?>
<configuration>
<!-- To customize the asp.net core module uncomment and edit the following section.
For more info see https://go.microsoft.com/fwlink/?linkid=838655 -->
<system.webServer>
<handlers>
<remove name="aspNetCore" />
<add name="aspNetCore" path="*" verb="*" modules="AspNetCoreModuleV2" resourceType="Unspecified" />
</handlers>
<aspNetCore processPath="%LAUNCHER_PATH%" arguments="%LAUNCHER_ARGS%" stdoutLogEnabled="true" stdoutLogFile=".\logs\stdout" hostingModel="inprocess" />
</system.webServer>
</configuration>
Note: On the Azure folder, %LAUNCHER_PATH% should have replaced with dotnet and %LAUNCHER_ARGS% replaced with .\projname.dll
Note 2: Make sure your project have logs folder for logging in your Visual Studio IDE.
On web.Release.config, it should looks like this:
<?xml version="1.0" encoding="utf-8"?>
<configuration xmlns:xdt="http://schemas.microsoft.com/XML-Document-Transform">
<!-- To customize the asp.net core module uncomment and edit the following section.
For more info see https://go.microsoft.com/fwlink/?linkid=838655 -->
<system.webServer>
<handlers>
<remove name="aspNetCore" />
<add name="aspNetCore" path="*" verb="*" modules="AspNetCoreModuleV2" resourceType="Unspecified" />
</handlers>
<aspNetCore processPath="dotnet" arguments=".\projname.dll" stdoutLogEnabled="true" stdoutLogFile="\\?\%home%\LogFiles\stdout" hostingModel="inprocess" xdt:Transform="Replace" />
</system.webServer>
</configuration>
Troubleshoot:
One option to test is changing modules=”AspNetCoreModuleV2″ to modules=”AspNetCoreModule” and restart the App Service. You should see the logging is working with older module.
You may turn on debug file handler with following handler settings to see more detail on the core startup error:
<?xml version="1.0" encoding="utf-8"?>
<configuration>
<!-- To customize the asp.net core module uncomment and edit the following section.
For more info see https://go.microsoft.com/fwlink/?linkid=838655 -->
<system.webServer>
<handlers>
<remove name="aspNetCore" />
<add name="aspNetCore" path="*" verb="*" modules="AspNetCoreModuleV2" resourceType="Unspecified" />
</handlers>
<aspNetCore processPath="%LAUNCHER_PATH%" arguments="%LAUNCHER_ARGS%" stdoutLogEnabled="true" stdoutLogFile="\\?\%home%\LogFiles\stdout" hostingModel="inprocess">
<handlerSettings>
<handlerSetting name="debugFile" value=".\logs\aspnetcore-debug.log" />
<handlerSetting name="debugLevel" value="FILE,TRACE" />
</handlerSettings>
</aspNetCore>
</system.webServer>
</configuration>
Reference: