Issue:
I need to store PII (Personally identifiable information) data like SSN into SQL server table, but I don’t want to store as plain text as it is sensitive information. Where and how to start encrypting my table column(s)?
Environment:
Microsoft SQL Server 2016 and Windows 10 with SQL Server Management Studio (SMS) v17
Resolution:
To encrypt SQL Server database table column(s) with Always On Encryption, please follow following sample steps.
Step-by-step instructions:-
- Create a Master Key by right click on “Column Master Keys” folder as shown below picture and choose “New Column Master Key…”:
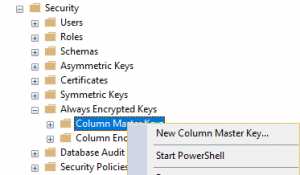
--// Or use this script to create a master key instead of GUI
--// Step 1 Create a Master Key
CREATE COLUMN MASTER KEY [MasterKey1]
WITH
(
KEY_STORE_PROVIDER_NAME = N'MSSQL_CERTIFICATE_STORE',
KEY_PATH = N'CurrentUser/My/B6601D804D204FFF47F5155D827ECD639AAC9DAD'
)
GO
- Create an Encryption Key by right click on “Column Encryption Keys” folder and choose “New Column Encryption Key..”
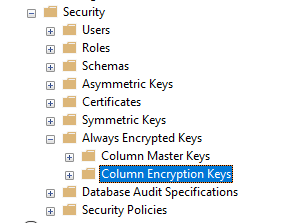
--// Step 2 Create an Encryption Key
CREATE COLUMN ENCRYPTION KEY [EncryptKey1]
WITH VALUES
(
COLUMN_MASTER_KEY = [MasterKey1],
ALGORITHM = 'RSA_OAEP',
ENCRYPTED_VALUE = 0x016E000001630075007200720065006E00740075007300650072002F006D0079002F006200360036003000310064003800300034006400320030003400660066006600340037006600350031003500350064003800320037006500630064003600330039006100610063003900640061006400B327F3D2ECC9AA6611222FF39D4134D4732FB35B83109428821D4BECB39DA098CD5863B8EB3F20BF0A3D36F6514A409BBE5FC12198B1959165A89DC7B51D5FF07847085EF4ADA36CD7FE237DA95CE603FC04D2CAC692D52CB2FB4020DBCCB6F7938341394168DFA0924B7938A2A60E4C56E450AE89126BEFBE7E63FB550F8689078892968DF5EC06321B2FF70B8F2BEEBE775F9452623CF257412FB25C3BCC665ED87C078AC5E286465A46D25E0AFD053D7045CE5393AC4ED8D8AC18C6A9241D219107F2543423116F27493E68C56008CABF79EA8A537F53A136C9D0C2521BC779CBC5EEE7C8AB8F4D6E709E66EC3B0F75B83B437E51ED339AADACAC631E120C8D0A10ED84BA760A12A83E7C8A4DEE96142B45C659A879AB33616B63EEEDDCFF7EA61422B8E11A3C3B4C220FCA8C3FBB1E2861ED12C5BFBA9DD429CA7AD934B35481FF6D8D66AF541FB9846CA87C157991AC37AA8474087756C97A33F51A69729D881D60170CE53CA52D42F24D1F6BE57F1FE50FA3B2B5FC03ECA188983206AA9FC9D581C3D31BEC19C6A0C89A590A5DD2D815E8B3BB8262FD865DD6339E70489FB3568C7D0A8615F228C384C8AA5A6A5F477E8A1870A084821DF75DFDED474F5E140AE3E68BC5B467B0C0073A596EBA9D27277488519284DFD8F7B443F4141F23571DE65817CD948321A76E25AD4853F887DCEB7926468ECA89504BF2FE455D
)
GO
- Create your own table or sample table here. Make sure “EncryptKey1” match to what you have in step 2:
--// Step 3 Sample Table
--// Sample Deterministic and Randomized encryption types
CREATE TABLE [dbo].[_Test](
 Id uniqueidentifier default (newid()) PRIMARY KEY,
 LastName VARCHAR(32) COLLATE Latin1_General_BIN2
ENCRYPTED WITH
(
ENCRYPTION_TYPE = DETERMINISTIC,
ALGORITHM = 'AEAD_AES_256_CBC_HMAC_SHA_256',
COLUMN_ENCRYPTION_KEY = EncryptKey1
) NOT NULL,
 FirstName NVARCHAR(32) COLLATE Latin1_General_BIN2
ENCRYPTED WITH
(
ENCRYPTION_TYPE = DETERMINISTIC,
ALGORITHM = 'AEAD_AES_256_CBC_HMAC_SHA_256',
COLUMN_ENCRYPTION_KEY = EncryptKey1
) NULL,
 Ssn INT
ENCRYPTED WITH
(
ENCRYPTION_TYPE = RANDOMIZED,
ALGORITHM = 'AEAD_AES_256_CBC_HMAC_SHA_256',
COLUMN_ENCRYPTION_KEY = EncryptKey1
) NOT NULL,
 SsnText CHAR(11)
ENCRYPTED WITH
(
ENCRYPTION_TYPE = RANDOMIZED,
ALGORITHM = 'AEAD_AES_256_CBC_HMAC_SHA_256',
COLUMN_ENCRYPTION_KEY = EncryptKey1
) NOT NULL
)
GO
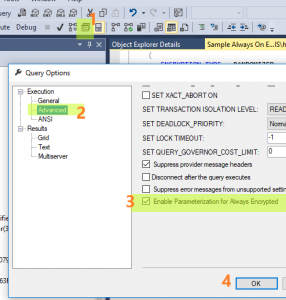
- To enable parameterization in SMS 17, go to menu Query/Query Options/Execution/Advanced/, then click on checkbox to enable “Enable Parameterization for Always Encrypted” item.
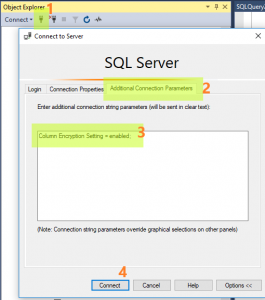
- To enable column encryption in SMS 17, go to menu Query/Connection/Change Connection/Additional Connection Parameters/, then enter “Column Encryption Setting = enabled;” (without double quotes) in the cleartext box.
- Now we can try to insert data into step 3 table. Below is sample insert with plaintext in SMS 17:
--// Step 4 Sample Insert
declare @lastName VARCHAR(32) = 'test1';
declare @firstName NVARCHAR(32) = 'tester';
declare @ssn INT = 123456789;
declare @ssnText CHAR(11) = '123-45-6789';
INSERT INTO [dbo].[_Test]([LastName],[FirstName],[Ssn],[SsnText]) values (@lastName,@firstName,@ssn,@ssnText);
GO

declare @lastName VARCHAR(32) = 'test2';
declare @firstName NVARCHAR(32) = 'tester';
declare @ssn INT = 987654321;
declare @ssnText CHAR(11) = '987-65-4321';
INSERT INTO [dbo].[_Test]([LastName],[FirstName],[Ssn],[SsnText]) values (@lastName,@firstName,@ssn,@ssnText);
GO
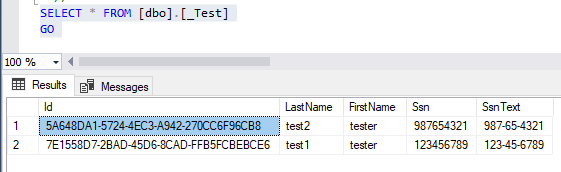
- To select data back in SMS 17, we just write query as usual without encryption key or cert:
--// Step 5 Sample Select
SELECT * FROM [dbo].[_Test]
GO
Result:
| Id |
LastName |
FirstName |
Ssn |
SsnText |
| 5A648DA1-5724-4EC3-A942-270CC6F96CB8 |
test2 |
tester |
987654321 |
987-65-4321 |
| 7E1558D7-2BAD-45D6-8CAD-FFB5FCBEBCE6 |
test1 |
tester |
123456789 |
123-45-6789 |
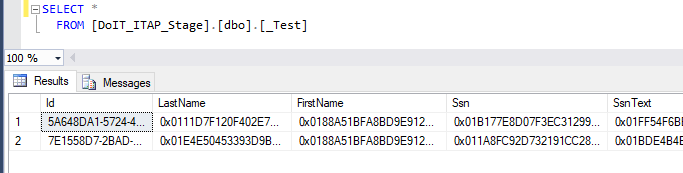
Result encrypted without Step 4 and Step 5:
| Id |
LastName |
FirstName |
Ssn |
SsnText |
| 5A648DA1-5724-4EC3-A942-270CC6F96CB8 |
0x0111D7F120F402E7F808D742B78F4225AB2EE22142F40FE3BCFEC6C52FAD1C97AF75736393E338609B6644C96295DF3CAD65738F99D88EB0C572694A1F1672D306 |
0x0188A51BFA8BD9E9123C248EE4C1A42493B790E8B79EDA0FB6782E338C33A07FBC211D019355842F34D7AD3048411BB6CC9C6B92850B4406DCA3F961B12BA34B20 |
0x01B177E8D07F3EC31299E6B7FC101ADA8D5A6AB6C4BC864103FCBBCF87AA3B2AAF6B4043B7CE2FED8C8EC3995724532DD494ABBDA42C17A627DF75F67EDD952BD3 |
0x01FF54F6BE6A3373C62FE33C15AAE3A9B3C543C256E50DF585E82209E99CC447C728C22206D5F2D939BBA321BD64FBB5ECA4EC5ECE64137298B1BEACB75F2F643E |
| 7E1558D7-2BAD-45D6-8CAD-FFB5FCBEBCE6 |
0x01E4E50453393D9B5E7331890173F4FEE36E69F3E0C25A0243159E3456FA9A3FCB742F632B75EBC07CC6916E64CE51E8B117E6180ECE6C51DD174872B814E0DEC5 |
0x0188A51BFA8BD9E9123C248EE4C1A42493B790E8B79EDA0FB6782E338C33A07FBC211D019355842F34D7AD3048411BB6CC9C6B92850B4406DCA3F961B12BA34B20 |
0x011A8FC92D732191CC28A9D8D75396FCFF8E1AE44885E5077543D2808257F5C114CF8D75C36CAB2A9D790B934015A9AD82CCF67B684A5B1126C844EA80B32CDD8D |
|
- Download Sample Always On Encryption script
Troubleshoot:
- If you get this error message, try “Enable Parameterization for Always Encrypted” on Step 4. If problem still exists, make sure you have correct datatype because it does conversion before execute actual select.
Msg 33299, Level 16, State 6, Line 15

Encryption scheme mismatch for columns/variables '@lastName'. The encryption scheme for the columns/variables is (encryption_type = 'PLAINTEXT') and the expression near line '15' expects it to be (encryption_type = 'DETERMINISTIC', encryption_algorithm_name = 'AEAD_AES_256_CBC_HMAC_SHA_256', column_encryption_key_name = 'EncryptKey1', column_encryption_key_database_name = 'Your DB Name') (or weaker).
- If you encounter below error, you may have mismatch datatype on the column.
Msg 33299, Level 16, State 6, Line 50

Encryption scheme mismatch for columns/variables '@pe1948c8ee4a946aabd71214b49b11d84', '@lastName'. The encryption scheme for the columns/variables is (encryption_type = 'PLAINTEXT') and the expression near line '9' expects it to be (encryption_type = 'DETERMINISTIC', encryption_algorithm_name = 'AEAD_AES_256_CBC_HMAC_SHA_256', column_encryption_key_name = 'EncryptKey1', column_encryption_key_database_name = 'Your DB Name') (or weaker).

Msg 8180, Level 16, State 1, Procedure sp_describe_parameter_encryption, Line 1 [Batch Start Line 41]

Statement(s) could not be prepared.

An error occurred while executing batch. Error message is: Internal error. The format of the resultset returned by sp_describe_parameter_encryption is invalid. One of the resultsets is missing.
- If you see column LastName encrypted when you do a select, try enable “Column Encryption Setting = enabled;” on Step 5
LastName

0x01CDED5BBA97F20A56D01E7F55DC667B83E388C948837B71F944C16563D40D53613E082580C87360B18B9B2247DCC077E91450AC1A2A9363E6D4AA172A031A6E05
Reference:
Parameterization for Always Encrypted – Using SSMS to Insert into, Update and Filter by Encrypted Columns